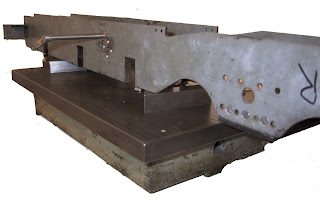
Frames


I started with a set of frames which had already been made. I was going to say - which saved a lot of sawing - but in fact I would probably have cut them in the mill.
The important thing is that the two blanks are riveted together and treat as a pair until complete.
As I had no idea how mine had been done, I started with dimensional checks. I soon found that the axle box spacing was marginally different (of the order of 20 thou) from one side to the other. And the horn slots had been finished individually and were different (hence the axle box spacing). Apart from that, they seemed ok.
I set the frames on parallels standing on a surface table.


The structure was not truly parallel, with a rock of at least 1/16 in in one corner. I slackened fixings and kept rechecking, until I found that the central cross braces were the cause of the problem - one was a few thou out of parallel. I milled a few thou off to make it truly parallel, and made up a shim (only 5 thou) to keep the spacing correct. I doubt if it was worth it - but at least its accurate. I kept rechecking as I re tightened fixings, and eventually it was dome.

The next thing was to put in the axleboxes and check the axle centres. For the completed wheel sets, there was only one way to fit them because of the differences in hornblock and axlebox dimensions. I actually checked these by mounting the wheel sets between centres on the lathe, and measuring the offsets from the axle to the hornblock slots.
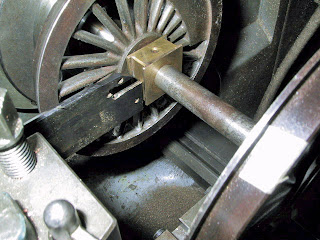


Again, all were different. I guess that the frames had been set up as a pair, with the blank axleboxes fitted, and then the axlebox bearings had been drilled and reamed in situ. So the wheel centres do end up the same on both sides of the frame.

If I was starting from scratch, I'd have done it differently. Like, I'd have kept the frames as a pair until after the hornblocks ha been milled.

For the axleboxes, I's have squared up the axlebox material, and drilled and reamed - or bored - the axle bearing. Then I'd set it up in the mill, with a stub axle through the journal, and resting on the jaws of the milling vice, and the upper surface horizontal. Then I'd have milled one of the recessed for the horn block.
Having done that and set a stop on the milling machine quill, I'd have rotated the axlebox through 180 degrees,(a small parallel and a couple of jackscrews will do the job) and milled the other horn block bearing. That way, they all end up identical, and with the axles central.

Comments

Popular posts from this blog

Wheels

What I started with was a set of frames with hornblocks fitted, and wheels turned. So I'm afraid I've no construction details for these. Except for quartering the wheels. You can do this either with a jig,or in the lathe. I've used both methods - a jig works well. Most books and drawings show jigs which are specific to one model, which is not brilliant. Since then, I have seen a general one detailed, which is a far beter idea. I've also quartered wheels in the lathe, which is what I chose to do this time. Two sets of wheels were already assembled and quartered, but, when I checked them, both were different ! The object is to set the two wheels on an axle at 90 Deg to each other -usually, the right leads on British locos. Having said that, the really critical thing about quatering is not the exact angle, but is that all the wheelsets on the loco must be set at EXACTLY the same angle. This is because the wheel relationships are locked by the coupling rods, and any diffe

Coupling Rods

The spacing of the coupling rod centres is critical to the free running of the loco. I measure each side separately and comparing it with the drawing. Any inaccuracies in making up the axle-boxes or in setting the crank-pins will show up here. I started by marking out the centres and outline on the rod blank, then drilled the centres, starting with a small centre drill, then drilling out at (say) 2BA clearance at one end, and 2BA tapping at the other. The rods tapered from 3/8 to 1/4 in. - i.e a taper of 1/16 in. on each side. So I marked out the centre line on the support bar, and another, offset by 1/16 in. I drilled and tapped a fixing for one end of the bar on the centre line, and attached the rod blank. Then I lined up the other centre on the 1/16 in offset line, clamped and drilled through 2BA tapping. Now I removed the rod blank, and opened the 2BA tapping hole on the rod blank to 2BA clearance. Also I tapped 2BA threads in the support bar and bolted the two together. I clampe

Tender Body

The original drawings showed what I think is the Hawksworth tender - I've previously made one in 5 in gauge, and thought the Collett tender would make an interesting change. It has a couple of major challenges - the top of the sides are flared, and also the rear corners of the tand are very rounded, so a tricky compound curve is created where they meet. I took the basic dimentions from the drawings, and scaled the Collet specifics from a couple of photographs. The fact that the major lines of the tender matched up with the profile of the cab gave me some useful reference points. Then there's a raised extension which fits on top. I left a tab which I curved to match the lower part of the tender, and riveted and soldered the two together. The other tricky bit was the rivets -there are several hunders of them, and they're very prominent. My solution was to make the tender tank out of thinner brass than usual -about 22 gauge. (Another reason for this was that I had a couple